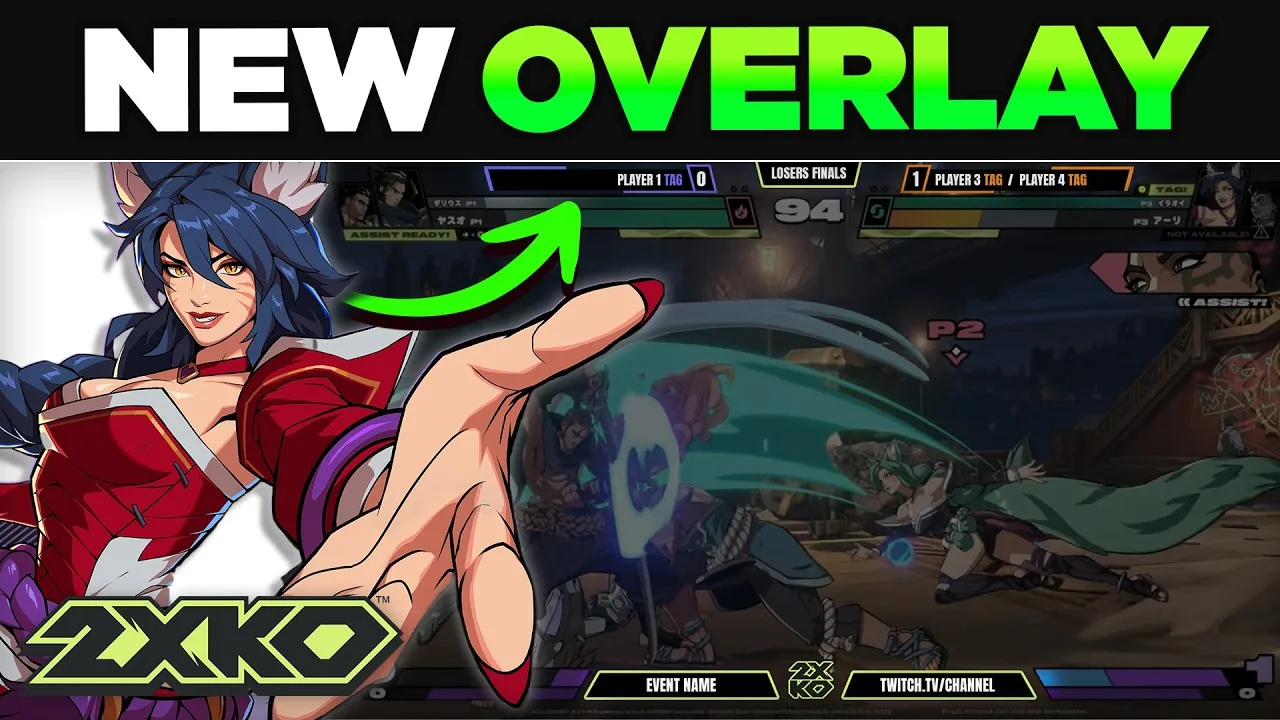
A scoreboard overlay is what separates a stream that looks like someone playing at home from one that looks like an event. Player names, a running score, a round title across the top — it’s the same layout every major fighting game broadcast uses, and it takes about fifteen minutes to build in OBS.
This guide walks the whole thing: dropping the graphic in, adding editable names and scores you can change mid-set, the bounding-box trick that stops long tags from breaking your layout, and a bonus setup that cycles your scoreboard through different colour schemes on its own.
It’s demonstrated with a 2XKO scoreboard, but nothing here is game-specific. Any fighting game overlay pack follows the same steps.
What’s in an overlay pack
Open the folder before you open OBS. A decent pack has more in it than the one file you were expecting, and knowing what’s there changes how you build.
- Pre-made overlays. The finished thing — a transparent PNG with the scoreboard laid out, supplied in several colourways. This is what most people will use and never touch again.
- Loose assets. Every piece on its own: the player 1 side, the player 2 side, the title slides. Use these if you want to build your own arrangement instead of the supplied one.
- Mock-ups. Reference images showing how it’s meant to look assembled. Not files you load into OBS — a target to aim at.
- Logos. Game logos bundled for convenience. Worth being clear about: these remain the property of the game’s publisher. They’re packaged so you don’t have to hunt them down, not sold to you.
- Licence and usage notes. Read them. The short version on most packs is that you can use them on your stream and your events, and you cannot resell or redistribute the assets themselves.
One genuinely useful habit before you start: put the folder somewhere permanent. OBS stores a file path, not a copy of the image. Move the folder later, or leave it in Downloads and clear it out, and every source in your scene breaks at once.
Step 1: Make the scene
In OBS, click + under Scenes and name it something explicit — “2XKO Ingame Overlay”. Keep it separate from your normal gameplay scene so you can cut to it for matches and away from it for everything else.
Step 2: Drop in the scoreboard
Under Sources, click + → Image, name it Scoreboard Overlay, then browse to your pre-made overlays folder and pick a colourway.
It should land at the correct size with no scaling needed — these are cut to 1920×1080. If yours arrives the wrong size, you’ve grabbed a loose asset rather than a pre-made overlay.
Add your game capture underneath it now, before you go further. Building a scoreboard against an empty canvas and only checking it against gameplay at the end is how you end up with text sitting on top of a health bar.
Step 3: Add the logo
+ → Image again, name it Game Logo, and pull the logo from the pack. Drag it to the centre of the scoreboard bar.
Name every source as you create it. You’re about to have six text layers that all say roughly the same thing, and “Text 4” tells you nothing when you’re trying to fix a score between games.
Step 4: Add the player 1 name
+ → Text (GDI+), name it Player 1. In the properties window, type a placeholder name and set the styling:
- Font: Anton — a free Google font, and the standard choice for broadcast-style fighting game graphics because it’s condensed enough to fit long tags
- Size: 58
- Colour: white (
#FFFFFF) - All uppercase, which matches how most fighting game UI is set
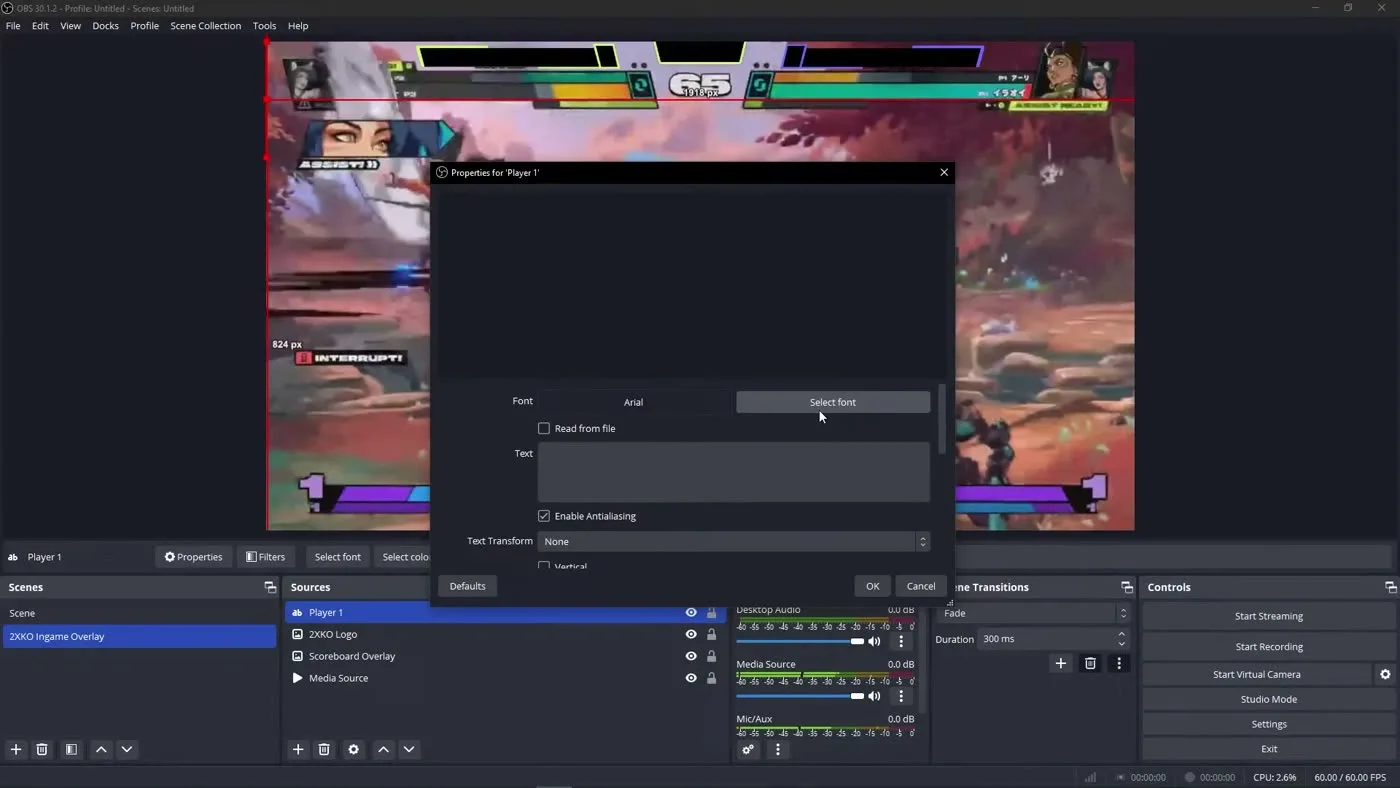
Drag it onto the player 1 slot. It’ll look right — until someone with a long tag turns up. That’s the next step, and it’s the one that matters.
Step 5: The bounding box trick
By default an OBS text source grows as you type. A short name fits. A long one runs straight over the game logo and out of the scoreboard, and you find out about it live with a bracket waiting on you.
The fix takes about ten seconds per source. Right-click the text → Transform → Edit Transform, and set:
- Bounding Box Type: Scale to inner bounds
- Alignment in Bounding Box: Center Right (for the player 1 name)
Then drag the bounding box handles so the box spans exactly the area the name is allowed to occupy.
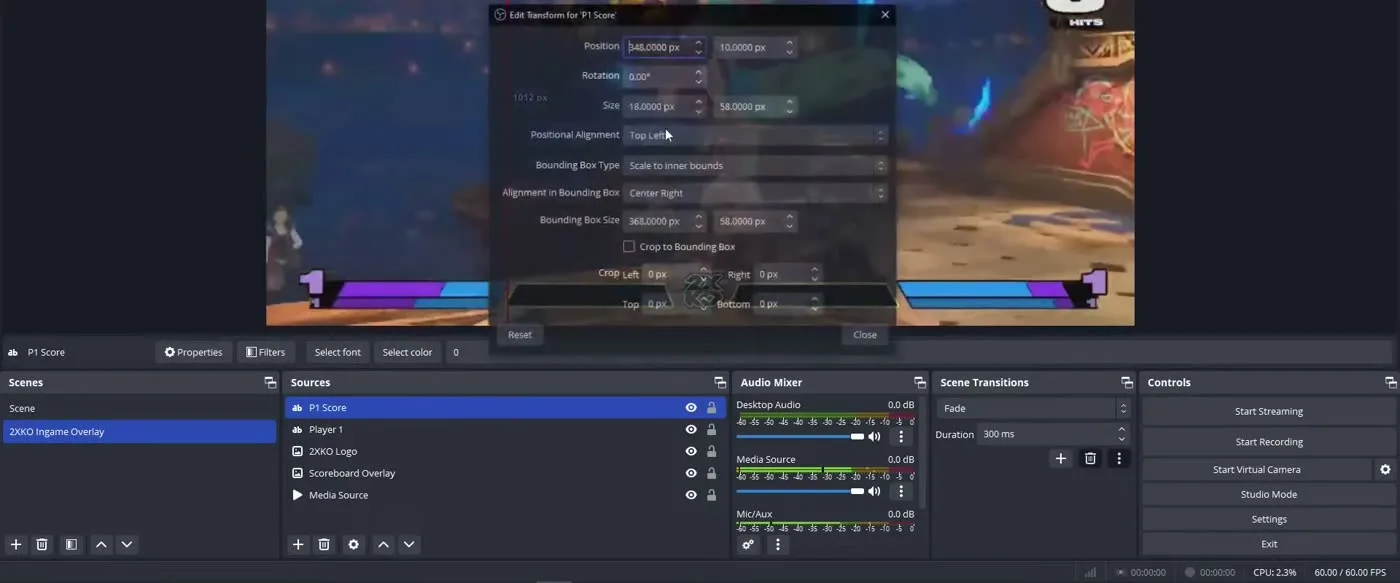
Close the dialog and it looks like nothing changed. Now type a much longer name — a full team tag, or two players for a 2v2 — and watch the text shrink itself to fit rather than overflow. It can no longer break your layout no matter what someone is called.
Do this on every text source you create. It’s the single difference between an overlay that survives a real bracket and one that only works with the names you tested.
Step 6: Add the score
Right-click Player 1 → Copy, then right-click in the sources list → Paste (Duplicate). Rename the new one P1 Score and set its text to 0.
Duplicating rather than creating fresh carries your font, size and colour across, so the score matches the name automatically.
Open Edit Transform and change the alignment to Center Center — a score should sit in the middle of its box regardless of whether it’s one digit or three. Then position the bounding box over the score slot.
Size the box for three digits, not one. Set it tight around a single 0 and the first time you run a first-to-10 set the number shrinks to something unreadable. Test it by typing 100, giving the box room until that still reads cleanly, then setting it back.
Step 7: Mirror it for player 2
Duplicate again for Player 2 and P2 Score, drag the bounding boxes to the right-hand side, and flip the name’s alignment to Center Left so it grows away from the centre instead of into it. The score stays Center Center.
Getting the two sides to line up exactly is worth the extra couple of minutes — you set this up once and then use it for every event you ever run.
Step 8: Round title and corner subheaders
Duplicate one more time, rename it Title, and drop it into the centre slot with Center Center alignment. This is your “GRAND FINALS”, “WINNERS SEMIS”, “FT5” — whatever the set is. You’ll want it slightly smaller than the player names.
Then two more duplicates for the bottom corners. Convention is the event name on one side and your channel on the other — TWITCH.TV/YOURNAME. Anyone who clips your stream carries that with them, which is the entire point of putting it there.
Dragging the bounding boxes by hand is fine and faster than it sounds. The Position fields in Edit Transform accept exact coordinates if you’d rather be precise.
Your finished layer stack
| Source | Type | Alignment in bounding box |
|---|---|---|
| P2 Score | Text (GDI+) | Center Center |
| Player 2 | Text (GDI+) | Center Left |
| P1 Score | Text (GDI+) | Center Center |
| Player 1 | Text (GDI+) | Center Right |
| Title | Text (GDI+) | Center Center |
| Event name / channel | Text (GDI+) | Center Center |
| Game Logo | Image | — |
| Scoreboard Overlay | Image | — |
| Game capture | Capture | — (bottom of the stack) |
Text on top, graphics under it, gameplay at the bottom. Once it looks right, click the padlock next to every source you’re finished with. It costs nothing and it stops you dragging the whole scoreboard sideways when you meant to select a name.
Bonus: make the scoreboard change colour by itself
This is the part most people don’t know OBS can do, and it costs you nothing extra because the colourways are already in your pack.
Hide your static Scoreboard Overlay source, then add + → Image Slideshow and name it Scoreboard Slideshow. Scroll to the file list, click Add Files, and select the colourways you want from the pre-made overlays folder. Then set:
- Visibility Behavior: Always play even when not visible
- Slide Mode: Automatic
- Transition: Fade
- Time Between Slides: 5000 ms
- Transition Speed: around 500–700 ms
- Loop: on
- Randomize playback: on, so it doesn’t run the same cycle every set
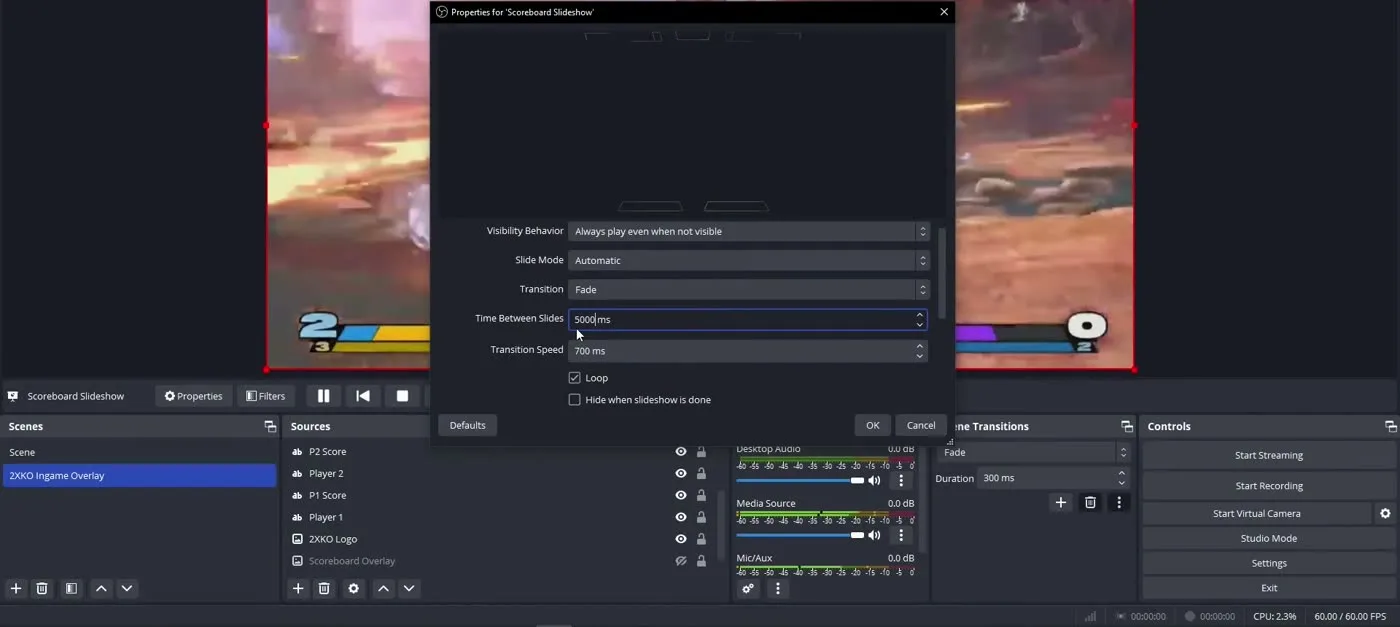
Your scoreboard now drifts between colour schemes while you play, with the text layers sitting untouched on top.
Don’t crank the speed. Dropping the interval to a second turns it into a flashing RGB strip, and a tag fighter is already a busy screen — you’ll be competing with your own overlay for attention. Five seconds reads as a design choice. One second reads as a fault. If you want it calmer still, push it to ten and pick colourways that are close to each other.
Worth flagging for anyone running events: this is also a viewer-comfort setting. Fast, high-contrast flashing is exactly what accessibility guidance tells broadcasts to avoid. Slow is both better looking and safer.
Running it during a real set
Changing a score mid-bracket is a double-click on the source and a keystroke. A few things make that painless rather than frantic:
- Keep the Sources list ordered so the two score layers sit next to each other
- Lock everything except the four fields you’ll actually edit
- Set both scores back to
0and update the Title between sets, not during one - Do a dry run with the longest tag in your bracket before you go live
If you run events regularly, duplicate the whole scene once it’s finished and keep a clean copy. Scenes get fiddled with, and having a known-good version to fall back on has saved more than one broadcast.
The short version
- Put the asset folder somewhere permanent
- New scene, then Image source for the pre-made overlay
- Image source for the game logo
- Text (GDI+) for Player 1 — Anton, size 58, white, uppercase
- Edit Transform → Scale to inner bounds → Center Right, then size the box
- Copy → Paste (Duplicate) for the score. Center Center, box wide enough for three digits
- Duplicate again for player 2’s side, name aligned Center Left
- Duplicate for the round title and the two corner subheaders
- Lock every source you’re done with
- Optional: swap the static overlay for an Image Slideshow at 5000 ms to cycle colours
Get an overlay
Everything above works with any scoreboard pack. If you need one, the Avatar Legends Fighting Game Scoreboard Overlay is built to this exact structure — pre-made overlays in multiple colourways, loose assets if you’d rather assemble your own, and mock-ups to work from. Instant download.
To finish the layout, the 2XKO animated alerts pack handles follows, subs and tips — there’s a full install guide for those too. The rest is in the shop.
Stuck on a step, or want someone to look at your scene before an event? The 2XKO Jungle Discord is the place. And once the overlay is sorted, the Season 2 tier list is what to read next.